24 Mar 2013

Scan Document to PDF


Portable Document Format (PDF) is good at compression. That’s why most of us prefer to keep their important scanned documents in PDF format instead of Jpeg or other formats.

If your scanner is saving your documents automatically to PDF format, then there is no problem. If not, then you have to change the printer properties to make the scanned document to be saved in PDF format.

For example let’s see how to change settings in Samsung SCX-4521 Printer. My printer is saving the scanned documents to Jpeg Format, let’s change the format to PDF automatically.

Power on the Printer and go to Start Menu>> All Programs>>Samsung Printer>>Printer Setting Utility.


On the Scan Settings - send Adobe Reader from ‘Available Scan Destinations’ to ‘Front Panel Destinations List’.


Make Sure the Adobe Reader is in the top of the list using up button as shown above. Then use “Send” option to apply the settings.


From now on wards whenever you have scanned a document the document will appear in PDF format only.

Note: This post is applicable for Samsung SCX-4521 printer series only. Though paths and options may change for various printers, the principle of the options is common for any printer.


9 Jan 2013

Reduce Image File Size using MS Paint


Open your image in MS Paint
Press Ctrl+W
Give 50/50 for first 2 options
ans save image in JPEG format.

This is for regular users.. If not understood just read the following...

Most of us may have faced this problem with photo file size, mostly during sending an E-Mail. As most of our E-Mail providers won’t let us to attach file size of more than 10MB this will be a bigger problem.

To reduce the image file size most of us uses a software like Photoshop or goes for online converters. The problem with these solutions is both consume lot of time (Ex. To Download and installation of software)

Most common reasons for huge file size are (a) Image Quality (b) Image Format. Here, we can deal with both of these problems using nothing but MS Paint

Quality: Some of our cameras or scanners are with high ‘DPI’ causing huge file size. To Decrease size you have to reduce some quality for sure. To do so.. do the following steps..

Open your image in MS Paint. Usually Right Click on the image and click Edit.. This will be shortcut to open image in paint, or else open MS Paint (type mspaint in Run and enter) and open your image file


Go to >> Image >> Stretch/ Skew (or else just use Ctrl+W)


In The stretch Column Give Horizontal ‘50’ and Vertical ‘50’ (These values are not fixed but you can learn after few experiments on few images) and hit ‘OK’…. Now you can see the image a little bit smaller than previous one


Format: The best compressed image format if ‘JPEG’ remaining ‘GiF’, ‘TIFF’ etc will consume lot of disc space.

So you have to use ‘save as’ option and save in JPEG format. See the process below.


Now you can see the HUGE difference between previous and present images.


8 Jan 2013

Make Folder INVISIBLE without Hiding


Do you know how to hide the folder! Of course- walk in the park. Right!

But the problem with hiding folder option is, anyone can access it by using ‘show hidden folder option’.

There is a way we can make your folder INVISIBLE without actually hiding it. In this process what you actually do is just change the folder icon to a blank icon.

See the following steps..


Right Click on the folder you want make invisible.

Now Rename the folder with a space (You have to hold ALT key and type 0160). Now your folder has No Name.


Your folder should be look like this.


Right click on the folder >> Properties >> Customize >> Change Icon.


In Change Icon option Scroll a bit till you find an empty spaces, Click any one of them.


Then OK.. Aplly.. Ok

Abracadabra.. Your folder became invisible.


Note:  Of course.. like there are several counter tricks for this one also, but worth knowing. Isn’t it!

4 Jan 2013

Change STARTUP and SHUTDOWN sounds in XP

Have you ever felt bored with the Start-up and Shutdown jingle (music) of your Windows XP or Vista ? If yes, here is the solution, now you use any of your favorite voice or music or dialogue as your PC’s shutdown and start up.

Choose the sound you want to use for start-up or shut down. You can even use your recorded voice or a small bit from your favorite song etc..

If the file you have chosen is in .Mp3 format convert the file to .WAV format. You can do it by using online mp3 to wav convertors.


Make sure the file size is below 500KB or else your start up will take a bit longer.

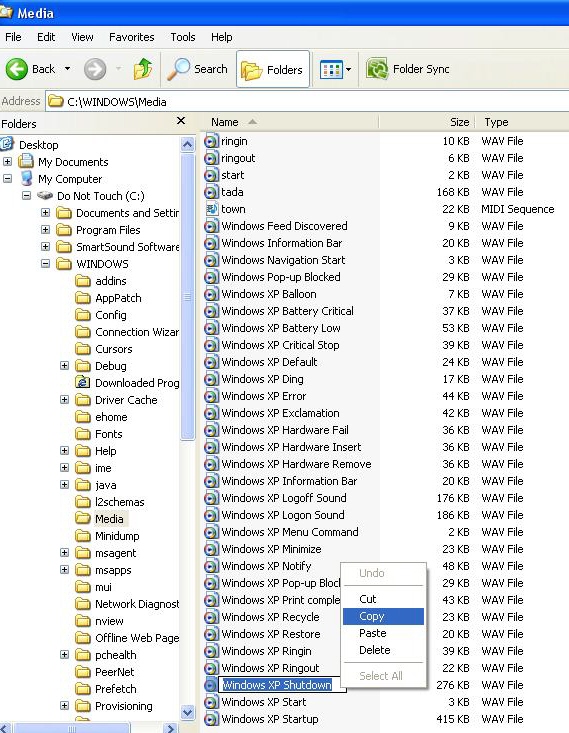
Now rename these files as “Windows XP Startup” or “Windows XP Shutdown (or Just copy the actual name and give it to your file)


Now go to “C:\WINDOWS\MEDIA”, here you will find files “Windows XP Startup” and “Windows XP Shutdown”, move them to some other locations, this step is required for,  in case you need to revert back these sounds, else you can ignore this step.

Now the files you have chosen and renamed,
just copy-paste or cut paste them in “C:\WINDOWS\MEDIA”, here you go,
now you can enjoy the new Start-up and shutdown.

Like this you can change your Recycle Bin/ Notifications etc.. sounds also.

21 Dec 2012

Hide Drivers in My Computer


Like Privacy!! Don’t want your data exposed to your buddies.. Then you came to right place.. There is a way to Hide Local Drives in your computer.

  • Open Run and type Regedit and hit enter
  • Go to HKEY_CURRENT_USER>>Software>>Microsoft>>Windows>>Current Version>>Policies>> Explorer
  • Add a New DWORD item and name it NoDrives

  • Give it a value of 3FFFFFF to Hide All Drivers
  • Restart your computer to take effect
Now open My Computer.  See the magic!! There will be No Drivers there.
What you have just did is you have hide your drivers, but not deleted them.. 


so you can still access your drivers.. Just open Run and type the drive you want to open (Ex. To open C-Drive type C:// and press).

To disable this option just delete the DWORD item you have given in registry.
If you want to Hide individual drivers you have to give different DWORD value (Ex. To hide C’ you would enter ‘4’ instead of ‘3FFFFFF’). For other drivers values are given below…

A = 1
B = 2
C = 4
D = 8
E = 16
F = 32
G = 64
H = 128
I = 256


11 Dec 2012

Use Notepad as your Personal Diary


Personally I don’t use Personal Dairy. But I centrally need a place to write some of my important notes and dates etc..

So one of my friend told me this simple trick to use Note Pad as my personal Dairy. Sounds weird but works for me..

Here how it is works.

1.    Firstly open a blank Notepad file.

2.    Now write .LOG as the first line in the file, and then press enter. Now save the file with any name and close it.

3.    Now open the file and you will find that the current date and time has been
appended at the end and the cursor is in the next line.

4.    Type your notes and then save and close the file.

5.    Each time you open the file, Notepad repeats the process, that is it appends the date and time to the end of the file and places the cursor below it.

Hope this Dairy will be help full to you also..

Delete Recycle Bin in XP


Have you ever tried to freak out your friends! Well here is a trick that makes your buddy to go wild.

Recycle Bin is one of the most common used icon on pc, why I’m mentioning this only because other icons like My Computer, My Documents can be deleted and restored. But you can’t do neither to Recycle Bin in XP.

However you can delete it using ‘regestry’ just follow the following steps.

·         Open Run>>Type ‘regedit’ and Exter

·         Navigate through the following (Taking Registry Back Up is compulsory)
HKEY_LOCAL_MACHINE\SOFTWARE\Microsoft\Windows\CurrentVersion\Explorer\Desktop\NameSpace\Delete {645FF040-5081-101B-9F08-00AA002F954E

·         Close Registry and restart and you wont find your Recycles Bin.

Note:  To recover the same you can either import the registry back up or create the same key at the registry.

Recover Deleted Show Desktop Icon


Yesterday I have accidentally deleted ‘show desktop icons’ button on my quick launch bar. However I was able to recover the icon using the following commands.

Go to Start>>Run and type the following command and press enter.
regsvr32 /n /i:U shell32.dll


A Pop-Up should appear as below.

Now you can see your icon on the quick launch hidden icons as shown below which you can drag and drop on Taskbar.


Most of the cases the above trick should work. If not then you can create your own script using Notepad
.
1.       Open Note Pad and paste the following.
[Shell]
Command=2
IconFile=explorer.exe,3
[Taskbar]
Command=ToggleDesktop

2.       Save the text file as ‘Desktop.scf’


3.       You can see the missing icon at your save place, Drag the icon to quick launch bar and Done..

If you find any difficulty in the above process you can just remember the shortcuts.

Show Desktop -  Win+D  

Listen to PDF File


Get bored of reading toned of content on PDF files!

Why don’t we listen to it instead of reading? Here is a funny tip to do it and we don’t even need any software or hacker level knowledge on computer. Just see how it work

1.       Open any PDF documents you want to listen (Which must be PDF 6.0 or above versions).

2.       Go to View>>Read Out Loud>>Active Read Out Loud ( To start process)
3.       Go to View>>Read Out Loud>>Read This Page Only (To listen the present page)


That’s it now you can listen and enjoy with eyes closed..

Shortcuts
Ctrl+shift+Y – To start process
Ctrl+shift+B - to hear the entire Document
Ctrl+shift+V - to hear the page
Ctrl+shift+C - to 
resume
Ctrl+shift+E - to stop

The secret behind this trick is Microsoft Text to Speech (Microsoft Sam)..

Disable/ Enable Recent Documents History


Recent Documents.. A big problem for me as I don’t want anyone to know which files I have seen at my work or home (Including some naughty pics). I don’t know what the purpose of this option is, but I’m sure it is a big threat to my privacy.

However I have found a solution to this problem by Disabling Recent Documents History in XP. Here how it works.

1.   Open the Registry Editor (select Start/Run, type regedit and click OK).

2.   Navigate to HKEY_CURRENT_USER\ Software\Microsoft\Windows\ CurrentVersion\Policies\Explorer..

3.    Create a new DWORD value of NoRecentDocsHistory

4.   Set the Data Value to ‘1’ to enable the restriction

5.   Click OK and close the Registry Editor and restart the pc once to take effect.

Now see the magic. Recent Document History.

Note: To Enable the Recent Document History you have to set the data value to ‘0’ .