25 Jan 2013

Hide Internet Download Manager 'Download Progress Bar'


Internet Download Manager (IDM) is well known to Netizens who like to download videos and other stuff faster.

IDM allows many more features with simple interface. There is a small annoying problem I face from IDM is its download status bar. As the status itself is available within the main interface.

To disable the Status Bar do the following.,

Open IDM >> Downloads >> Options


In the options go to >> Downloads >> Customize download progress bad >> click Edit.


Now you can see the options you required choose the one you like and apply (Choose Do not show to disable).


Change Facebook Login ID


THE most popular Social Network site ever made.. Everyday millions of people login to meet their friends and to make new friends.

I came to know that many of them don’t know how to change their login ID. Most of them are thinking ID used for sign up cannot be changed. This post is for them.

Changing FB ID is ‘Kid Stuff’. Just follow these steps.

Login to Facebook as you do regularly with your ID and Password.


After login go to settings on right side top of the FB. Open Account Settings..


Here you can change your Facebook Name, Username, Email, Password also… To change your login ID click Edit next to username. If it asks for Mobile Verification then complete the verification and you can see Username and password.


Give the Username as you want and give the existing password only.


I use this option to remove my tail on ID (@gmail.com). 

Note: FB Username can be changed 'Once in a Life Time' so make sure you use this option when you really needed it.

24 Jan 2013

Disable Touchpad on Laptop


Have you ever face inconvenience with touchpad on your laptop? I do face it often because of its sensitivity.

While typing something in your lippy, there are many possibilities of touching your touchpad accidentally, leading to change in cursor location. This leads to such a pain in a##.


To disable or enable touchpad there are different shortcut for each laptop. For example for Samsung mini you have to use “Fn+F5”.


Not all the models have the same shortcut key. But you can check them randomly (Ex: ‘Fn+F1’, Fn+F2…Fn+F12). One of them must disable your touchpad.


23 Jan 2013

Secured Browsing

One of my friend was running an Internet CafĂ©. He requested a post to save his customers privacy, as most of the users don’t know how to be secured when they are using internet (especially non personal PC).

As per my knowledge three most popular browsers for internet surfing are Firefox, Google Chrome & Internet Explorer.

If you made small changes in the privacy settings to your system then anyone using your pc is secured. Let me tell you about individual browsers.


Mozilla Firefox: 
One of the open source web browser developed by Google.

To change Firefox privacy settings follow the following steps (I’m showing you 18.0 version)

Always make sure no one see what you have seen after you left the PC.

Firefox allows this with simple option called ‘Clear History When Firefox Closed’. Go to Tools >> Options >> Privacy >> Use Custom Settings for History >> Clear History When Firefox Closed. Make sure you have enabled it.


And on the settings column beside this option, select settings and make sure you have enabled all the options.


Next go to Security >> Password >> Deselect both Remember Password and Master Password


Google CHROME

Another Freeware web browser developed by 
Google.

I was worried because Chrome options are getting changed for version to version. I can tell you about the one I was using (Version 23.0).


To change privacy settings go to  ‘Customize Chrome’ option below the close button of the browser and go for settings >> Show Advanced Settings (at the bottom) >> go for Privacy
Disable both ‘Autofill’ & ‘Save Password’ on the ‘password and forms’ option as shown in the figure.


Now go to Content Settings on the privacy and Cookies Select ‘Keep Local Data until I quit my browser’.


Internet Explorer: 

One of the oldest and worst browser developed by Microsoft.

Go to Tools >> Internet Options >> Content >> Auto Complete >> Settings

Disable All the options appear there like Web Address, Forms, Passwords…
That’s it your system is safe for browsing for fresher’s and friends.

You can use Third party software like “CC Cleaner” to delete all the records you have gone through.

Send feed back for more posts..

12 Jan 2013

Avast Anty Virus


With more than 150 Million users worldwide, Avast in The best Free Anty Virus since ‘stone age’.

Many of us may use Avast but don’t know how to use it perfectly. We can do this by altering some of the settings within the Anty Virus interface. In this post I would like to guide you through the standard installation, Activation and Settings alteration for best performance of the best anty virus.


Installation:  The recent versions of Avast have a 'single click installation'. So need not to worry for guidance. Follow the steps below…

Open the downloaded .exe file and you will see a welcome screen. Click on ‘Express Install’ to proceed. Uncheck Chrome and Toolbar if you don’t want.


The installation bar will show u status of installation.


A quick scan will be performed after a system restore. This may take few minutes.


That’s it. Setup is being installed successfully..


Activation:   Although Avast is for free, we have to activate to enjoy 1 year validation. All you need to do is follow the simple steps mentioned below.

After completion of installation a popup will appear to promote you to paid version, but use ‘Continue with protection’ option. (In some cases this popup may not appear)


If the popup does not appear open avast and use ‘register now’ option.


A pop up will appear as like above said for 'paid version'. Choose ‘Basic Protection’


A popup asks our personal information. You can fool it by giving any name and any ID. Or else you can give correct details.


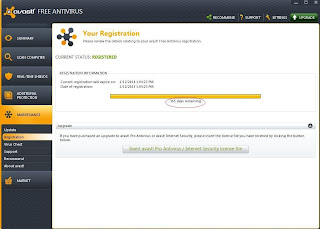
Activation is DONE. Now You can see '365 days remaining message' on interface.


Settings: Now you have activated ‘Default’ Avast is with you. Let’s change few settings now.

Auto Action: You may have seen that Avast won’t heal the Viruses itself, instead of healing, it asks us what to do if it found any virus. If we neglect, the virus simply do its messy business. To make Avast work itself you have to set ‘AUTO ACTION” settings.

To enable ‘Auto Action’ go to Scan Computer >> click on’ More details’ on any of the scan options


Open ‘Settings’ and open ‘Actions’ on the left panel.. Now Change the settings as shown in the Snap shot. Order goes like this {Repair – Move to Chest – Delete}.


Now apply the same settings to ‘PUP’ and ‘Suspicious’ also.


You have just modified the settings for one type of scan only. Now apply the similar settings to the remaining scan also (Quick Scan, Fill Scan, Removable Media Scan & Selected folder Scan)


Popups: The one of the annoying about avast is its ‘Popups’.  There are 4 types of popups in Avast (Info, Update, Warning, Alert). By default these popups will stay on the screen for 20 seconds, we can change it to minimum.

To change popup settings go to Settings (on the right side of the interface) >> Popups >> Change the duration to ‘1’ for all the popups.


It may take few minutes to change settings,  but worth a lot as we set the anty virus to do all the work by itself only.


9 Jan 2013

Reduce Image File Size using MS Paint


Open your image in MS Paint
Press Ctrl+W
Give 50/50 for first 2 options
ans save image in JPEG format.

This is for regular users.. If not understood just read the following...

Most of us may have faced this problem with photo file size, mostly during sending an E-Mail. As most of our E-Mail providers won’t let us to attach file size of more than 10MB this will be a bigger problem.

To reduce the image file size most of us uses a software like Photoshop or goes for online converters. The problem with these solutions is both consume lot of time (Ex. To Download and installation of software)

Most common reasons for huge file size are (a) Image Quality (b) Image Format. Here, we can deal with both of these problems using nothing but MS Paint

Quality: Some of our cameras or scanners are with high ‘DPI’ causing huge file size. To Decrease size you have to reduce some quality for sure. To do so.. do the following steps..

Open your image in MS Paint. Usually Right Click on the image and click Edit.. This will be shortcut to open image in paint, or else open MS Paint (type mspaint in Run and enter) and open your image file


Go to >> Image >> Stretch/ Skew (or else just use Ctrl+W)


In The stretch Column Give Horizontal ‘50’ and Vertical ‘50’ (These values are not fixed but you can learn after few experiments on few images) and hit ‘OK’…. Now you can see the image a little bit smaller than previous one


Format: The best compressed image format if ‘JPEG’ remaining ‘GiF’, ‘TIFF’ etc will consume lot of disc space.

So you have to use ‘save as’ option and save in JPEG format. See the process below.


Now you can see the HUGE difference between previous and present images.


Elevator Trick


This is useful for those who often use elevators ! like Me.
When you have your apartment or office is in top floor, we use lift to save our time. But if someone on the next floor calls the lift the lift stop for them, wasting some of our precious time. This could be very irritating when we are in rush.


There is a way to make lift not to stop for them till u reach your destination.
To make it work, when you Press the Floor No. Button of your floor also press Close Door Button simultaneously, then the elevator would not stop for anyone in the way and will stop directly on your destination floor!


Note: For some of the elevator systems this trick might not work! 

8 Jan 2013

Make Folder INVISIBLE without Hiding


Do you know how to hide the folder! Of course- walk in the park. Right!

But the problem with hiding folder option is, anyone can access it by using ‘show hidden folder option’.

There is a way we can make your folder INVISIBLE without actually hiding it. In this process what you actually do is just change the folder icon to a blank icon.

See the following steps..


Right Click on the folder you want make invisible.

Now Rename the folder with a space (You have to hold ALT key and type 0160). Now your folder has No Name.


Your folder should be look like this.


Right click on the folder >> Properties >> Customize >> Change Icon.


In Change Icon option Scroll a bit till you find an empty spaces, Click any one of them.


Then OK.. Aplly.. Ok

Abracadabra.. Your folder became invisible.


Note:  Of course.. like there are several counter tricks for this one also, but worth knowing. Isn’t it!

7 Jan 2013

Use Multiple Yahoo Accounts Simultaneously...!!


After social network revolution by Facebook also… still Yahoo! Messenger remains a very popular instant messenger.

Yesterday I tried a simple trick to fool my close buddy by chating with him as a girl, some how he got a doubt that it was actually me that was teasing him and he told me to login to yahoo! (as I have 24hr internet). For a moment I thought I was caught and did the quick GooGle for a solution.

Can you believe it.. you can open more than single Yahoo messenger within the same PC! Let me share you the trick.


Just do the following steps

 Go to Start ----> Run . Type regedit then Enter.

Navigate to HKEY_CURRENT_USER >> Software >> Yahoo >> pager >>Test.

On the right pane , right-click and choose new Dword value.

Give a name as Plural.

Double click it and assign a decimal value of 1


Now close registry and start yahoo messenger and logn.. Not you can open another yahoo messenger and can login with another ID.


4 Jan 2013

Change STARTUP and SHUTDOWN sounds in XP

Have you ever felt bored with the Start-up and Shutdown jingle (music) of your Windows XP or Vista ? If yes, here is the solution, now you use any of your favorite voice or music or dialogue as your PC’s shutdown and start up.

Choose the sound you want to use for start-up or shut down. You can even use your recorded voice or a small bit from your favorite song etc..

If the file you have chosen is in .Mp3 format convert the file to .WAV format. You can do it by using online mp3 to wav convertors.


Make sure the file size is below 500KB or else your start up will take a bit longer.

Now rename these files as “Windows XP Startup” or “Windows XP Shutdown (or Just copy the actual name and give it to your file)


Now go to “C:\WINDOWS\MEDIA”, here you will find files “Windows XP Startup” and “Windows XP Shutdown”, move them to some other locations, this step is required for,  in case you need to revert back these sounds, else you can ignore this step.

Now the files you have chosen and renamed,
just copy-paste or cut paste them in “C:\WINDOWS\MEDIA”, here you go,
now you can enjoy the new Start-up and shutdown.

Like this you can change your Recycle Bin/ Notifications etc.. sounds also.